Homemade Sweet Treat, Marbled Mint Candy
This delicious sweet treat for marbled mint candy is so easy to make. The best part about it is, if you can run a microwave then you can make this candy. All the ingredients can be kept in the pantry for when you need a hostess gift or a dessert to bring to a gathering. If you can’t find candy canes the hard peppermint or spearmint candies will also work, they are just a little harder to break up.

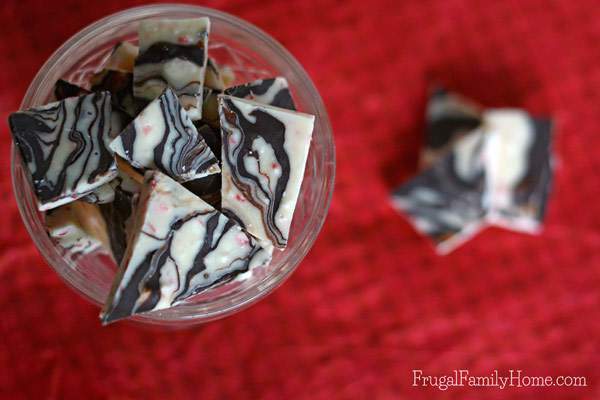
This marbled mint candy recipe is so delicious it has the right mixture of vanilla and mint with just a swirl of yummy chocolate throughout.
I like the marbled look this candy has and I think the chocolate really adds a nice flavor to the candy. If the chocolate is left out, the candy would taste overly sweet and minty. The semi-sweet chocolate gives it a good balance.
Here’s the printable recipe for your recipe file and read on below for some helpful tips in making the marbled mint candy.
Marbled Mint Candy
Ingredients
- 1/2 cup Semisweet Chocolate Chips
- 12 oz Vanilla Almond Bark or Candy Coating
- 2/3 cup Crushed Candy Canes or Peppermint or Spearmint Candies
Instructions
- Line a baking sheet with foil or a silicone mat and set aside.
- In a medium, microwave-safe bowl heat the vanilla almond bark at full power in 1-minute intervals. Stirring after each interval until melted and smooth. Be careful not to overheat and burn it.
- Once the vanilla bark is melted stir in the crushed candy canes and stir well.
- Then spread the mint bark onto the lined cookie sheet and set aside.
- Place the chocolate chips in a small microwave-safe dish and microwave at 1-minute intervals until melted and smooth.
- Drizzle the melted chocolate chips over top of the mint bark.
- Using a butter knife make a few passes the lengthwise and widthwise through the bark to create the marbled effect. Don't push hard with the knife as the foil will cut easily.
- Chill for about 25-30 minutes or until the candy is set and firm.
- Once firm lift the candy off the foil and break into serving size pieces.
- Store in a covered container up to 2 weeks.
Tips for Making the Marbled Mint Bark
You want to be careful while heating the vanilla almond bark in the microwave. If you overheat it, it can get grainy. I’ve done this a few times. It’s best to err on the side of caution and heat it at one-minute intervals with stirring between.
To crush up the candy canes I usually leave them in their wrapper and hit them with the rolling pin or meat tenderizer on the cutting board to break them up into very small pieces. Great to do when you have had a frustrating day, take out your aggression on the candy.

To make the marble effect, I drizzle the melted chocolate on top of the vanilla/mint candy, then use a knife to make the marble look effect. Just making a few passes with the knife is all that is needed to make the candy look nice. I make 3 passes lengthwise and then 3 widthwise. Don’t make too many passes or you will have a mixed up mess. A little is better than a lot in this case.
I usually let my candy cool on the counter but if you are in hurry for the candy to set, you can place it in the refrigerator or the freezer to speed up the setting time. Then once the candy is set, break it up into bite-sized pieces and store in an airtight container in a cool place.
The Marbled Mint Candy looks great packaged up in colored cellophane with a ribbon to tie it closed, add a cute tag for gift giving.
Have you ever made peppermint bark before?
Read more post from the 31 Days of Homemade Sweet Treats series.
This article was updated to include new more irresistible photos, enjoy!
If You Like this Recipe
Subscribe and you'll get Recipes
sent right to your inbox!
Click the button below and fill out the form.

That peppermint bark looks delicious, Shelly! I love how you add bits of candy cane to it.
This looks like something my whole family would love! I like how easy it is to make too 🙂